This article is for administrators and staffing users.
Overview
This article shows you how to create a Custom Hiring Process in Recruiting.
The hiring process features let your team build custom steps that match your real hiring workflows.
After you create a custom hiring process, you can assign it to each job record. This lets your team show how hiring steps can change from job to job.
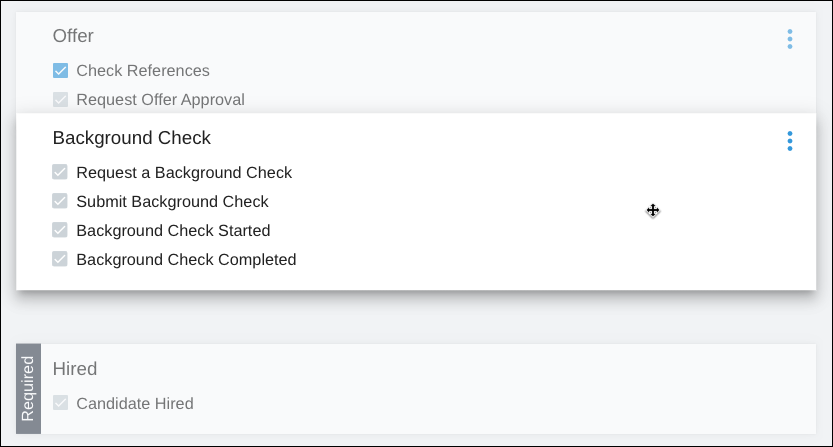
Your team also gets more flexibility with the Background Check stage in custom hiring processes.
Customers who benefit from creating a Custom Hiring Process
These customers use the default hiring process, but it does not meet their needs:
- The default stages work well enough, but they do not match our real hiring workflow.
- Our team completes background checks as part of hiring, but the order in the system does not match how we do it.
- Some jobs we hire for need different steps when we review candidates.
Create a custom hiring process
- Go to People > Hiring > Applicant Tracking. The Active Jobs screen opens.
- Select Admin > Job Management. The Job Management screen opens and shows the Hiring Process tab for Create a New Process.

- Enter a Process Title.
- Each process must have a unique title.
- You cannot save a hiring process if the title is already used.
- Review the list of default stages in the hiring process to decide which ones you want to disable:
- Select the vertical ellipses on the stage you want to turn off, then select Disable.

- To turn it back on, select the vertical ellipses, then choose Enable.

- Select the vertical ellipses on the stage you want to turn off, then select Disable.
- Create Custom Stages and Statuses when creating or updating a Hiring Process.
- Select the blue plus sign (+) between each Default Stage in the Hiring Process Form.

- Select the blue plus sign (+) between each Default Stage in the Hiring Process Form.
- Change the order of any Stage in a Hiring Process.
- Drag and drop the Stage Card to the new location, or
- Select the menu icon in the Stage Card, then choose Move Up or Move Down.

- Drag and drop the Stage Card to the new location, or
- Select Save to keep your changes and create the custom hiring process.
Manage your hiring processes
- Go to People > Hiring > Applicant Tracking. The Active Jobs screen opens.
- Select Admin > Job Management. The Job Management screen opens and shows the Hiring Process tab for Create a New Process.
- Your list of available hiring processes displays in the Enabled Processes.
- Select an enabled hiring process to view the stages and sequencing for that custom hiring process.

- Note: You can edit a hiring process only if it is not yet associated with a job in the system. This rule helps protect candidate data already tied to job records.
- Select an enabled hiring process to view the stages and sequencing for that custom hiring process.
- You can Disable a hiring process your team no longer wants to use in the system:
- Disabled hiring processes are not available to select when creating new job records or when selecting the Default Hiring Process for your company account.
- Note: You cannot disable a hiring process if it is designated as the Default Hiring Process for your company account
- To disable a process:
- Select the desired hiring process from the list of Enabled Processes.
- Select the vertical ellipses on the right of the process title.
- Select Disable.

- Disabled hiring processes display in the Disabled Processes section.
- Enable a disabled hiring process:
- Select the vertical ellipses.
- Select Enable. This adds the hiring process back to your list of Enabled Processes.

- Select the Settings tab to view or change the Default Hiring Process for your company.

- The selected Default Hiring Process is auto-populated in the Hiring Process field on your job records when:
- You create a new job, or
- Submit a new job approval request.
- You can modify the selection in the Hiring Process field before job activation.
- The selected Default Hiring Process is auto-populated in the Hiring Process field on your job records when:
Assign hiring processes to jobs
Each job record has a Hiring Process field.
- The Hiring Process field is visible and editable when you access the Create a Job or Request Job Approval tab.

- The hiring process designated as the Default Hiring Process populates in the field automatically. You can modify this selection at any time before activation.
- When a job is activated, the selected hiring process is visible in the Job Info window.

- You can modify the Hiring Process selection for a given job record anytime.
- Any candidates currently in a status who is not present in the new hiring process is moved back to their original status (such as, Job Seeker).
- Any actions taken on the candidate before this update are tracked in the candidate's newsfeed.

- The selection in the Hiring Process field shows in key areas across the system, including:
- The Active Jobs Dashboard
- The status bar in any linked candidate records


Updated: March 12th, 2026 9213 views 1 likes
*This content is for educational purposes only, is not intended to provide specific legal advice, and should not be used as a substitute for the legal advice of a qualified attorney or other professional. The information may not reflect the most current legal developments, may be changed without notice and is not guaranteed to be complete, correct, or up-to-date.