Overview
- We partnered with several of the leading HRIS and payroll providers dedicated to assisting small and medium-sized businesses.
- Integrations with our partners are free and allow employers to export of your hired applicant data with just one click.
- Electronic onboarding is a great way to efficiently hire your new employees.
- Pending new hires can complete portions of their own employee profile and acknowledge of any new hire paperwork they generally received.
- For additional information on our Integration Partners, reach out to our Support Team and we can send you our most up-to-date list of vendors and contacts at each company.
Important:
- To see the Onboarding functionality in Recruiting, you must have the necessary role:
- The Hire Employees role sees all pending new hires.
- The Limited Employee Hiring sees only those new hires who they transferred from the ATS application.
Initiate Onboarding (Users with ATS Access)
What Data Fields flow from ATS to Onboarding - Pending New Hires
When the decision is made to hire an employee, you can transfer their data from the Applicant Tracking System (ATS).
- First name
- Last name
- Physical address
- Contact information
-
Attachments:
- Includes Application, Offer Letter, Resume and any document uploaded to the candidate profile in the ATS.
- Image files are not accepted
- Pay Rates (candidate pay information)
- EEO information-only if collected during hiring process
- Work Location
-
Job Title
How to Start the Onboarding Pprocess for an Employee
- In ATS, after you mark a candidate as Hired, the system asks you when you want to transfer the new employee. Select one of these:
- Transfer Now
-
Transfer Later
Note: There might be a slight delay before transferred employees can be seen in Paycor’s systems due to validating and queuing up the data.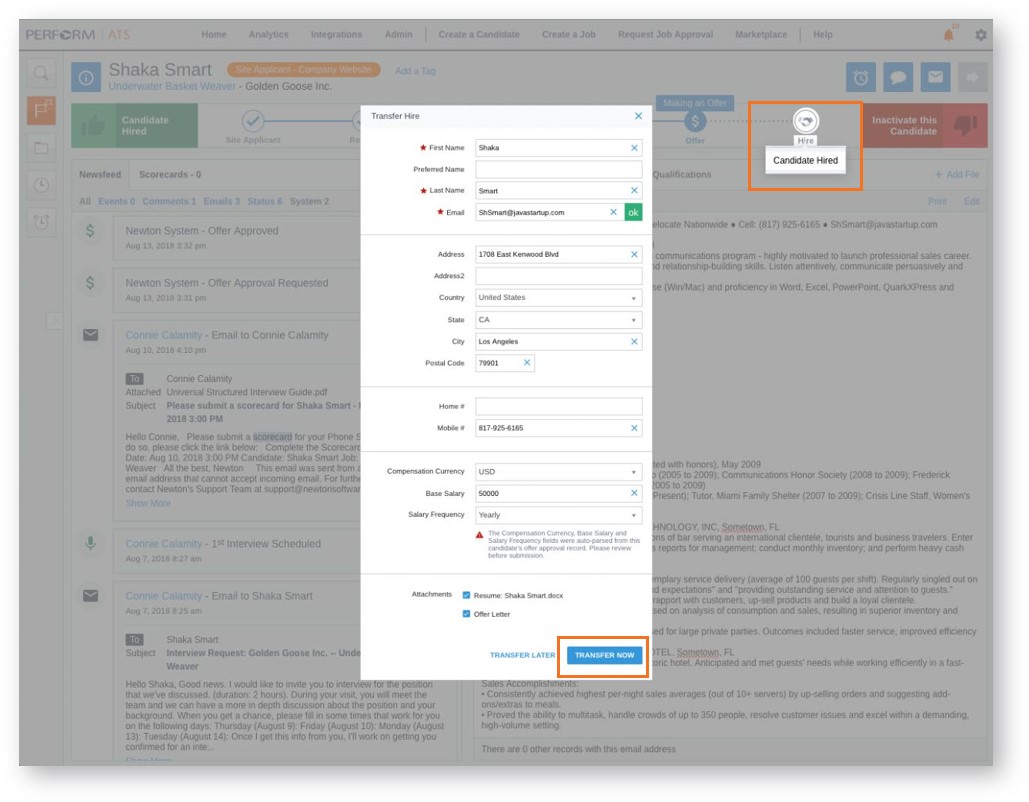
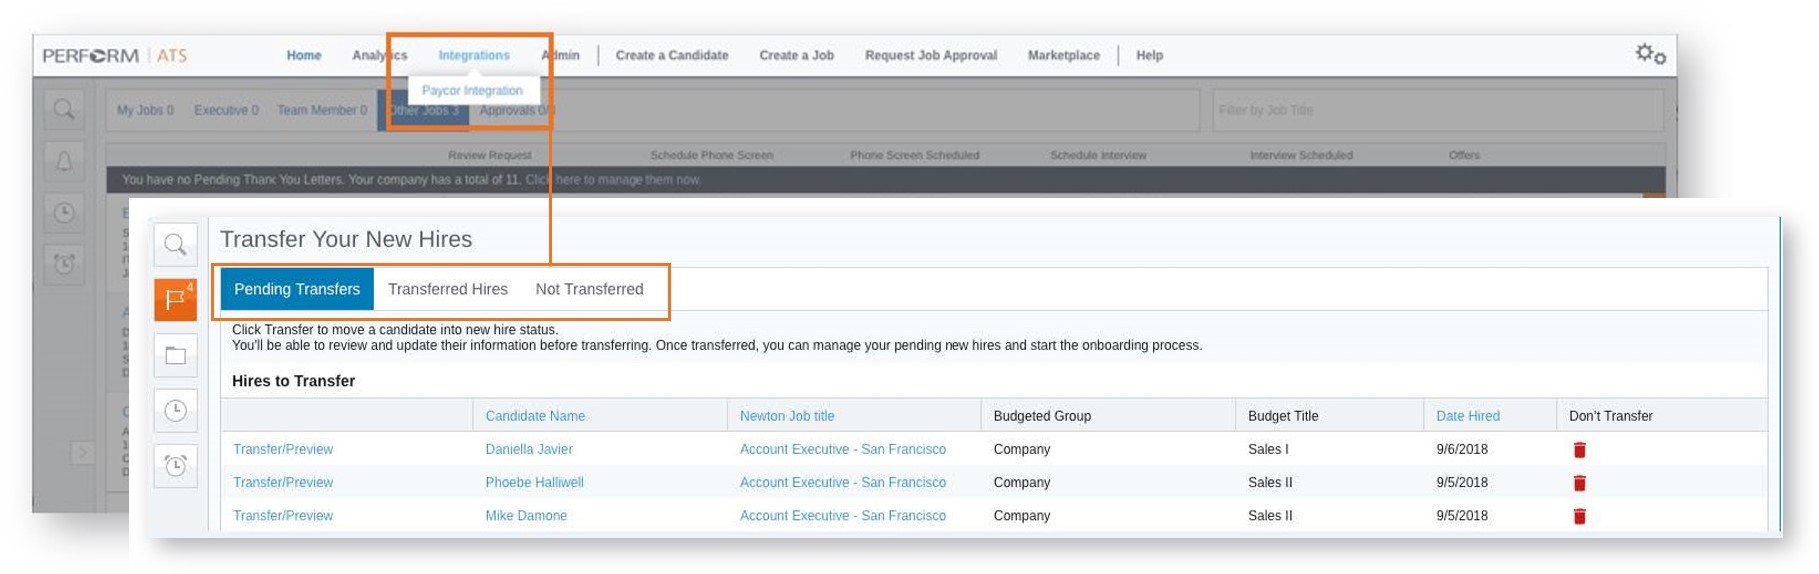
- To see the transfer status for new hires, on the task bar click Integrations and select Paycor Integration. The system tracks:
- Pending Transfers: Hires not transferred will be stored in the Pending area.
- Transferred Hires: Any candidate who has already been transferred.
-
Not Transferred: Candidates selected as Don’t Transfer on the Pending tab.
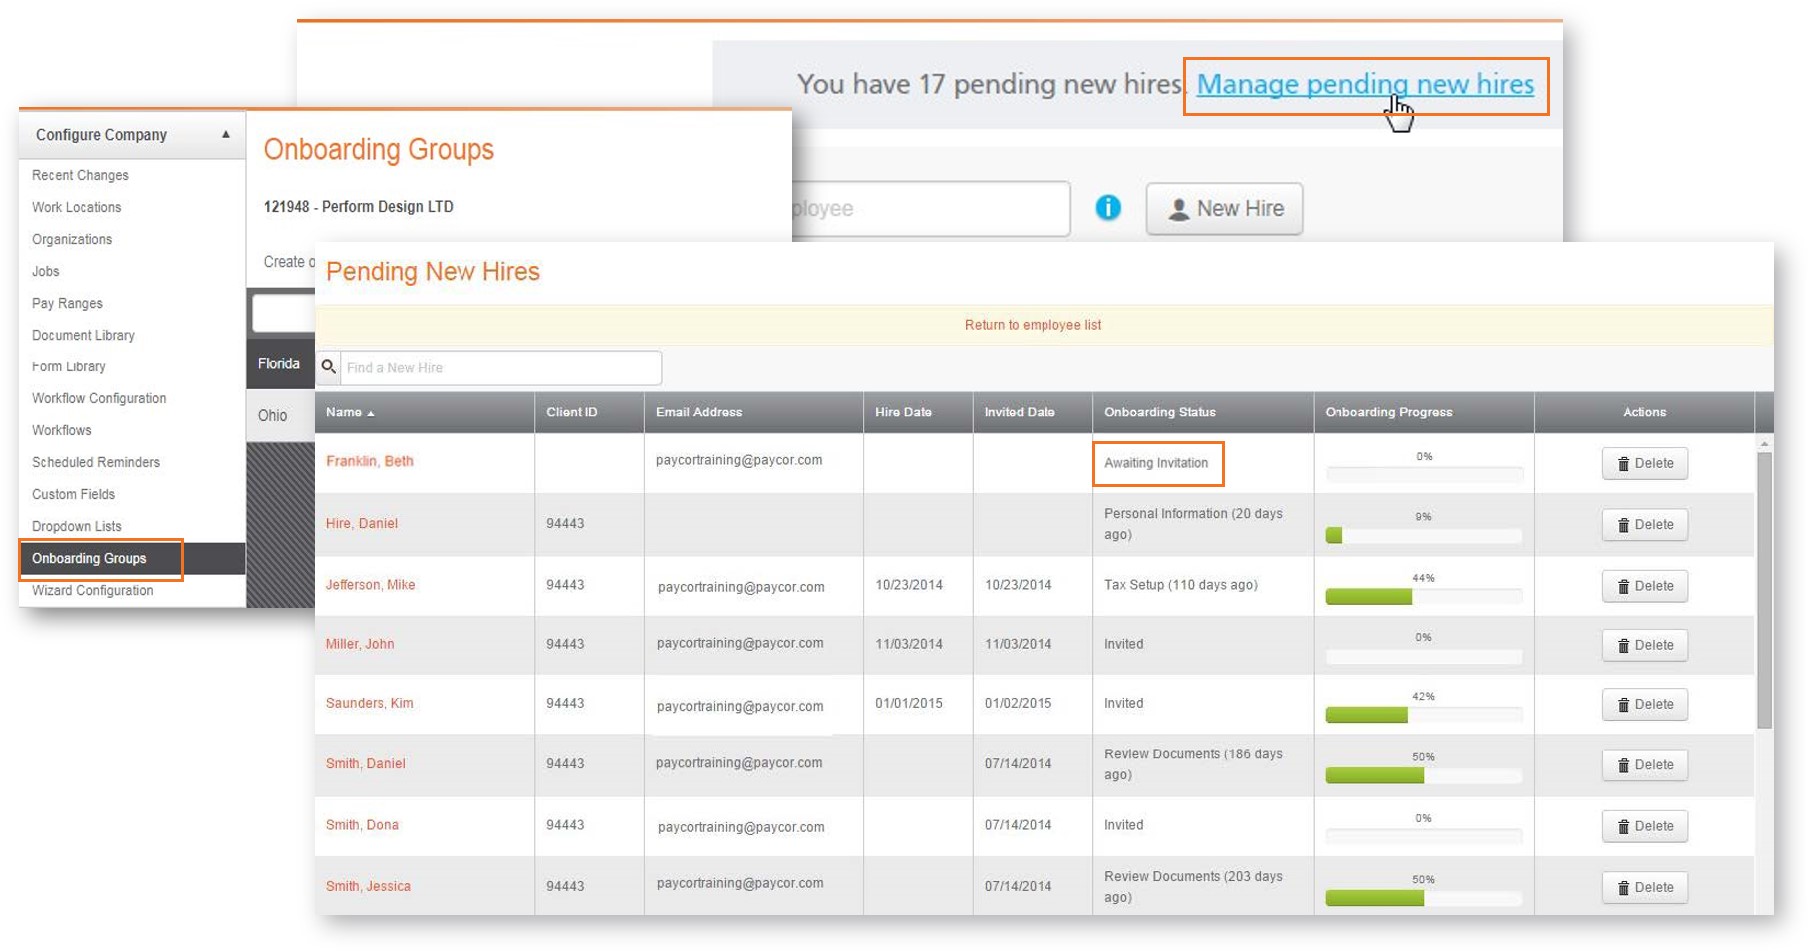
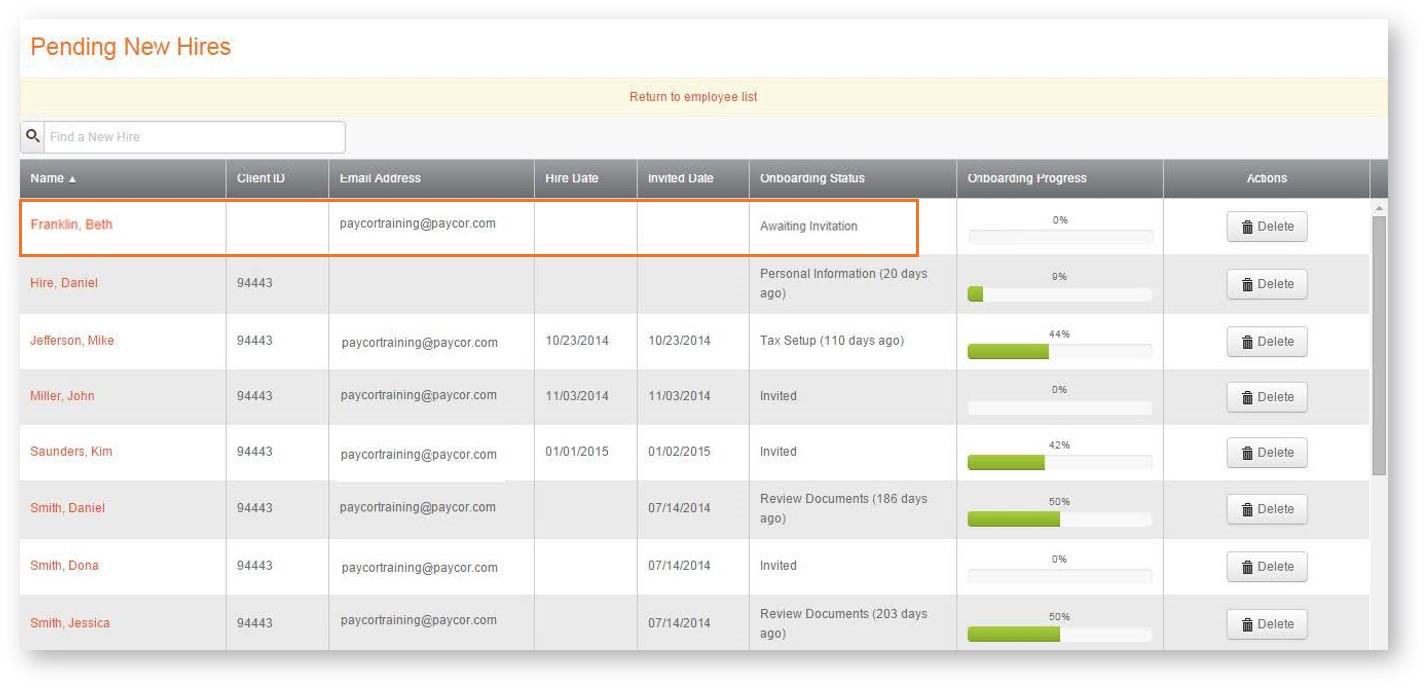
- After the new hire is transferred, they are added to the Pending New Hires screen in Paycor where the Onboarding registration email can be sent. You must complete these tasks:
- Click Manage Pending New Hires.
- Mark the new hires' Status as Awaiting Invitation.
- Use the New Hire Setup wizard to send the Onboarding registration email.
How to Send Registation Emails
Users with the Hire Employee role are notified by email when a pending new hire submits their onboarding package.
Follow these steps to manage and complete the profiles for a pending new hire:
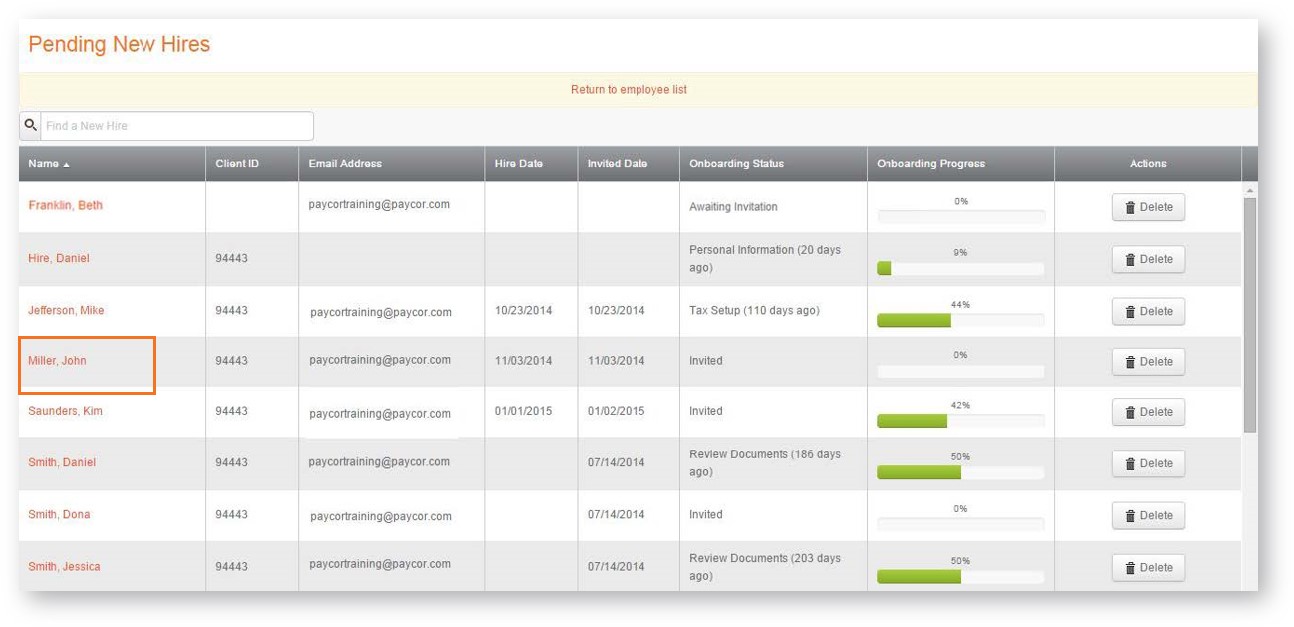
- In Paycor, access the Manage Employees section and click Manage pending new hires. All pending new hires appear. You can see the status of their invitation, registration, and onboarding progress.
Note: You must have the Hire Employees role to access this section.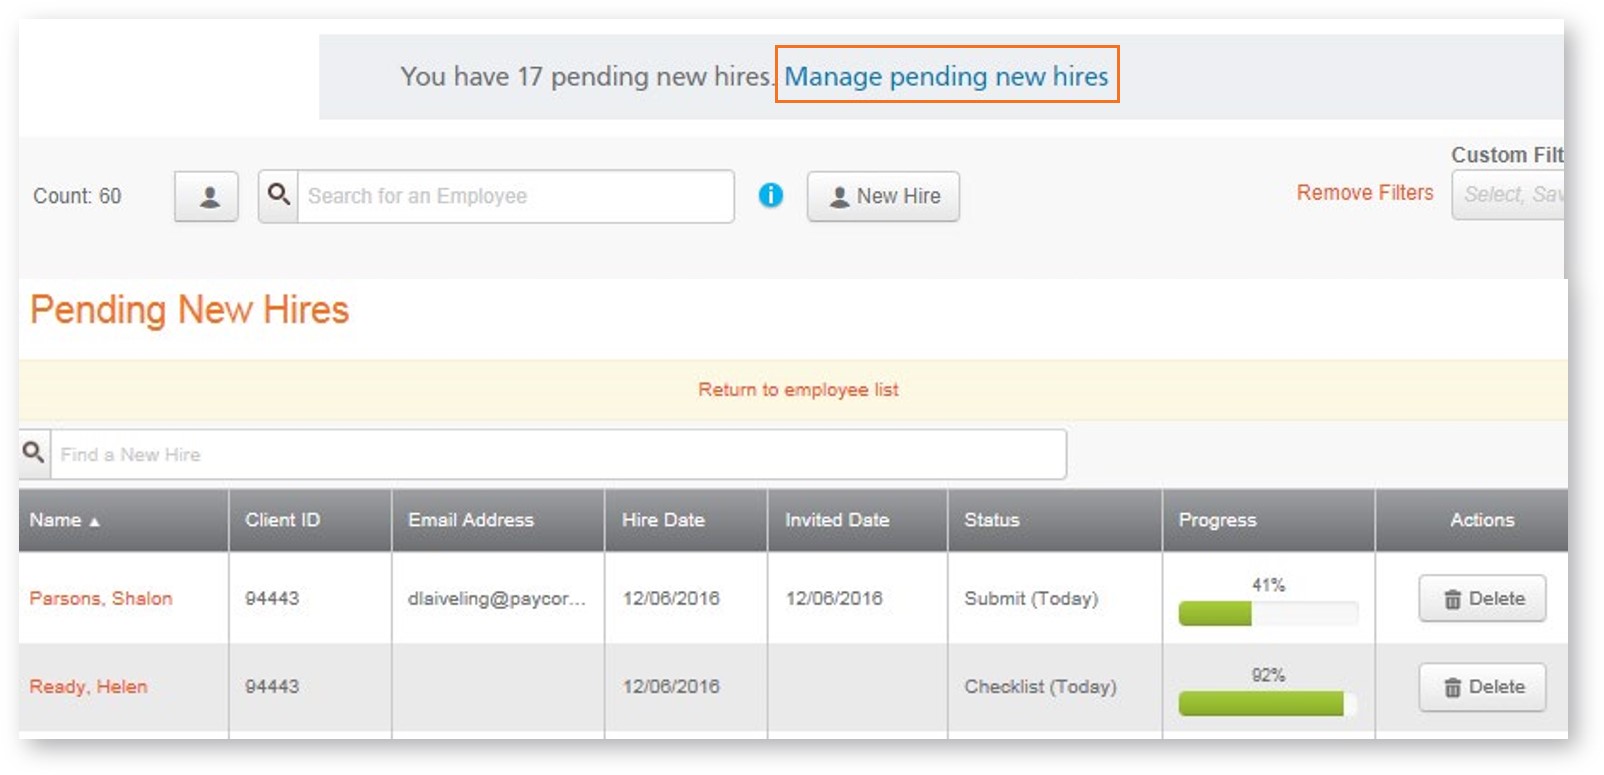
- Locate any Pending New Hires with a Status of Awaiting Invitation and click their names. The New Hire Setup wizard appears.
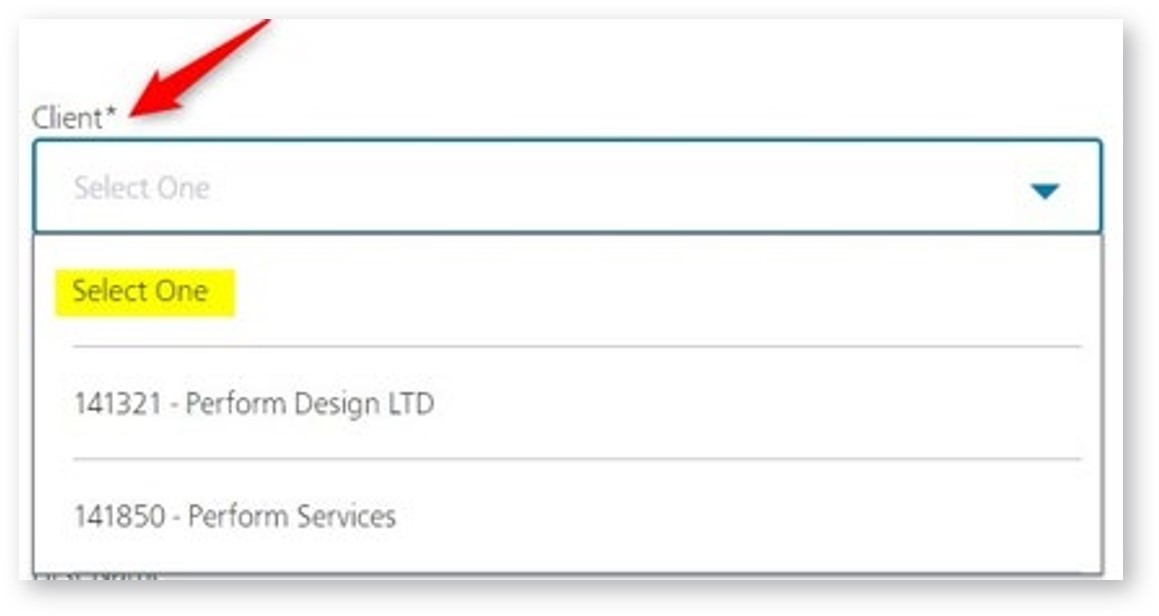
- If you manage multiple client IDs, select the appropriate Client the new hire should be added to.
- If you are hiring a 1099/Independent contractor, mark the checkbox next to 1099/Independent contractor, and then enter the business name or the new hire’s first and last name.
Note: The Direct Deposit and I-9 sections are skipped for these new hires. Administrators still see the Direct Deposit step for independent contractors.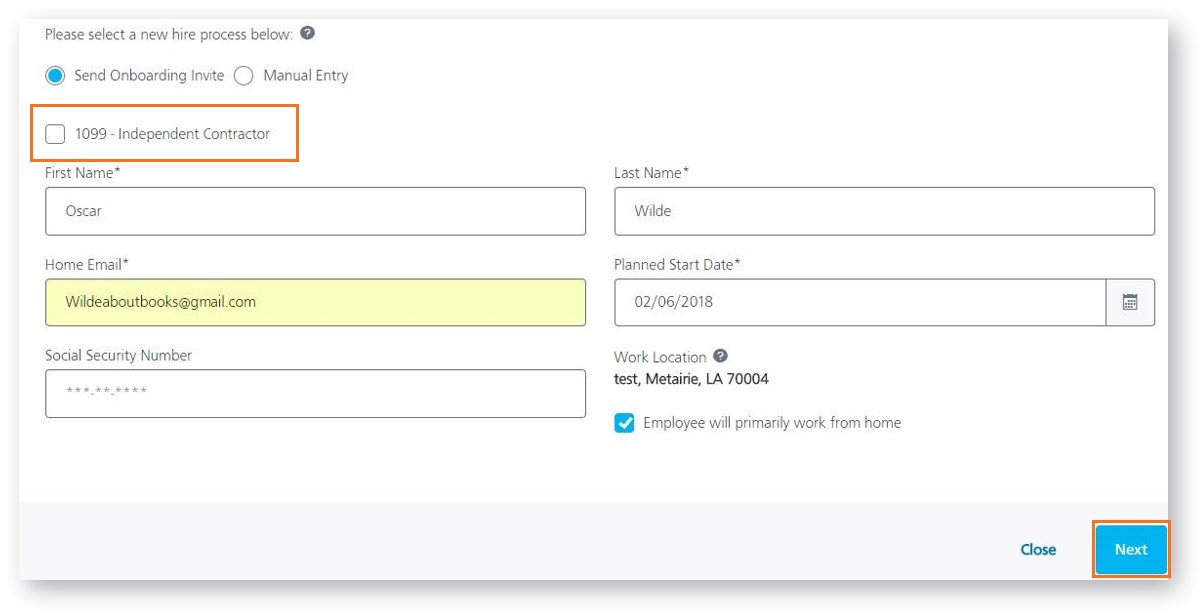
- If necessary, completed (or edit) these fields for the new:
- First Name
- Last Name
- Home Email
- Planned Start Date
- Social Security Number
- Work Location
- If the new hire works from their home, mark the checkbox next to Employee primarily works from home.
Notes:- A Home Email must be entered to ensure the employee receives the onboarding link and instructions.
- The work-from-home employee’s home address is used as the address where tax documents are sent.
- Click Next.
- Select the Onboarding Group for the new hire and the Onboarding Documents assigned to that group appear. Onboarding Groups can be set up under Configure Company > Onboarding Groups.
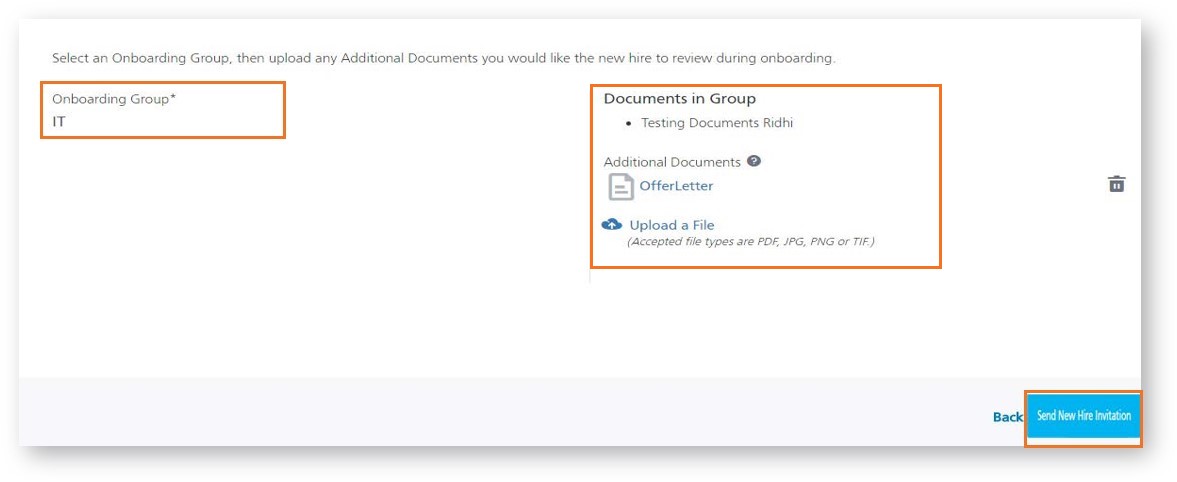
- To attach any additional files specific to the new hire, such as their Offer Letter, click Upload a File and find and select it. This attaches the file to the new hire's profile.
- Click Send New Hire Invitation.
- When the pop-up window displays the employee number assigned to the employee (you can change this if desired), click Save. This occurs:
- A message at the top of the Manage Employees page confirms the new hire was added successfully. Once hired, their ATS URL is available on their Personal page.
- The new hire’s status changes to Invited.
How to Complete New Hire Profiles
After sending the new hire registration, you can complete the remaining sections of a new hire's profile information:
- In Paycor, access the Manage Employees section and click Manage pending new hires. All pending new hires appear. You can see the status of their invitation, registration, and onboarding progress.
- Click an employee's name to complete their profile.
Notes:- All local taxes can be added after the new hire wizard. Employers are responsible for setting up local occupational taxes on their organizational structure in Configure Company. These work-in taxes cannot be added during the new hire process.
- Employers must add local residential taxes directly to their employee’s profile when appropriate if not added during the new hire process.
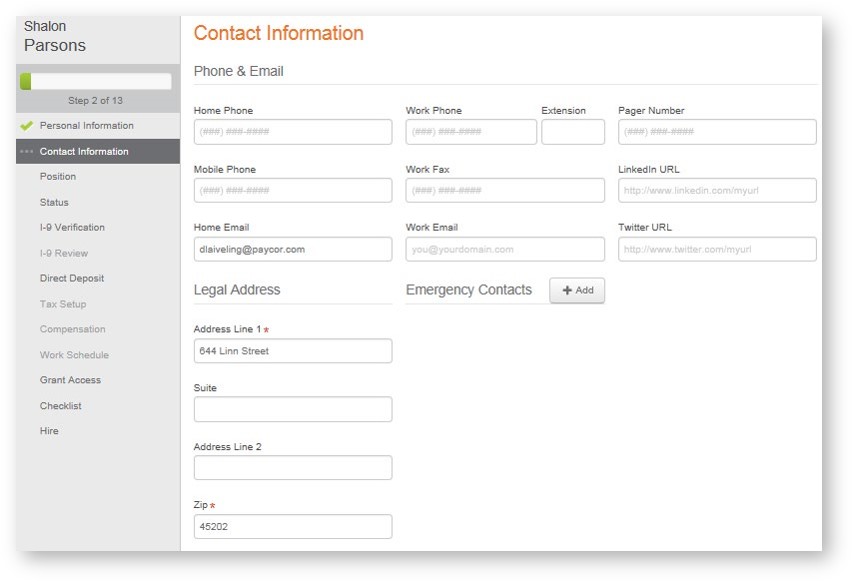
- On the Contact Information screen, all information currently submitted by the employee is viewable and you can overwrite any information if necessary:
- The employee pay rate effective date defaults to the employee’s hire date, but this can be modified as needed.
- The employee position effective date defaults to the employee’s hire date, but this can be modified as needed.
- You must complete the Employee Pay Rate field. If you want to change this, use the Wizard Configuration section to modify its behavior (include/exclude/require) in the Hiring Wizard.
- If setup, the Checklist screen appears where you can mark off completed items.
Note: After a checklist is created and a new employee is hired, you can access their checklist by going to Manage Employees, selecting the employee, and in the Employee section, click Checklist. Here you can mark off items and add additional items to customize the checklist for the specific employee.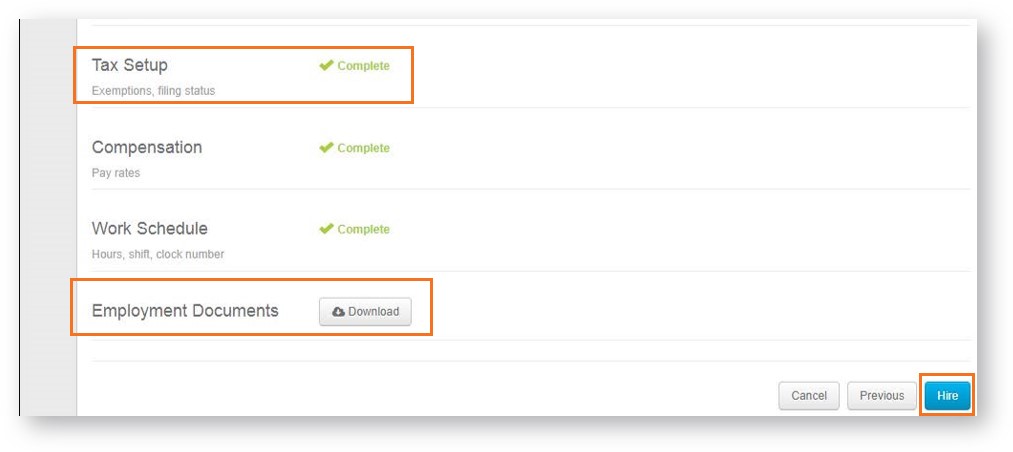
- The Hire screen displays the status of each hiring screen. Click a link to review the screen and add or edit any missing or incorrect information.
- After all the hire screens are completed by the employee or you, at the bottom, click Employment Documents to download them.
Note: You can also access these documents later on in the Employee's profile. - To officially hire the pending employee, click Hire.

- When a pop-up window appears displaying the assigned employee number (you can change this)., click Save. A message at the top of the Manage Employees screen confirms the new hire was added successfully.
Notes:- If another employee exists in your company relationship with the same SSN, you will see a pop-up message to confirm hiring, or choose to link the employees if they are the same person.
- If the New Hire Workflow is active with approvals, then the pop-up showing the employee number will not appear until all approvals have been completed.
- After an employee goes through onboarding, the documents they reviewed and acknowledged are viewable on their Employee > Documents profile screen, including their resume and any document attachments from Applicant Tracking.
Watch an Expert Session On-Demand Video
05/10/24 974 views 0 likes